---
title: How Do I Connect and Upload Video Episodes to Apple Podcasts?
description: Learn what CoHost handles automatically when you publish video to Apple Podcasts, and what you'll need to have ready before you submit.
---
[Skip to content](https://help.cohostpodcasting.com/how-do-i-connect-and-upload-video-episodes-to-apple-podcasts#main-content)
[Submit a Support Request](https://help.cohostpodcasting.com/kb-tickets/new?hsLang=en-us)
[](https://www.cohostpodcasting.com/?utm_source=hubspot&utm_medium=banner&utm_campaign=knowledge-base)
Open main navigation
Close main navigation
- [Submit a Support Request](https://help.cohostpodcasting.com/kb-tickets/new)
How can we help you?
- There are no suggestions because the search field is empty.
1. [CoHost Help Center](https://help.cohostpodcasting.com/?hsLang=en-us)
2. [Create, publish, and edit my episodes](https://help.cohostpodcasting.com/create-publish-and-edit-my-episodes?hsLang=en-us)
September 14, 2026
# How Do I Connect and Upload Video Episodes to Apple Podcasts?
## Learn what CoHost handles automatically when you publish video to Apple Podcasts, and what you'll need to have ready before you submit.
Video podcasts are how more and more listeners want to experience your show – and now Apple Podcasts is one more place they can watch it. You can publish your video episodes to Apple Podcasts right from CoHost, without learning any new tools or workflows.
Behind the scenes, Apple requires video episodes in a streaming format called HLS (HTTP Live Streaming). Doing this by hand is a technical, multi-step process, so CoHost does it for you.
When you upload a video episode and select Apple Podcasts as a destination, CoHost automatically compresses your file, builds all the required video/audio streams, validates them, and hosts everything, so it stays reachable for as long as your episode is live.
In this article, we'll go over the Apple-side setting you need to confirm before you publish, how to connect Apple Podcasts, and what your video file needs to meet so CoHost can process it without errors.
#### **Check that Apple Podcasts has video enabled for your show**
Connecting Apple Podcasts in CoHost — including the API key you generate in Apple Podcasts Connect and enter here — is separate from whether Apple has actually turned on video delivery for your show. Apple Podcasts can accept a video that's successfully uploaded and processed, and still keep it invisible to listeners if this setting is off – a working connection and a successful upload don't guarantee it. Listeners can still hear the audio version of your episode as normal; it's specifically the video playback that won't be available.
Before connecting, go to **Apple Podcasts Connect → your show → Settings,** and confirm HLS video podcast delivery is listed as available. If it isn't, you'll need to contact Apple Podcasts directly to request it before your videos will be visible, even once CoHost shows the episode as Published.
[Reach out to our support team](https://help.cohostpodcasting.com/kb-tickets/new?hsLang=en-us) if you're unsure how, and we can help point you in the right direction.
### **How to connect Apple Podcasts in CoHost**
**Connecting Apple Podcasts is a one-time setup per show**. Once connected, you'll be able to publish video episodes directly to Apple Podcasts from your episode creation flow.
#### **Before you begin:**
Apple needs proof that it's really you authorizing CoHost to publish on your show's behalf. Before you connect, you'll grab a few credentials from your own Apple Podcasts Connect account and hand them to us.
You'll need API credentials from your Apple Podcasts Connect account. Here’s how to generate them:
1. Go to [podcastconnect.apple.com](http://podcastsconnect.apple.com/) and sign in with your Apple ID.
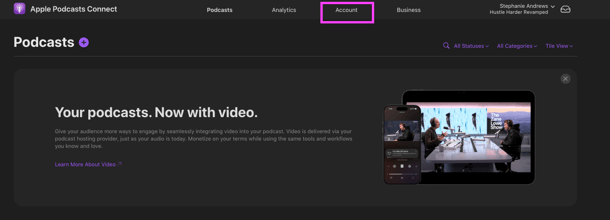
2. In the top navigation, click **Account → Keys.**
****
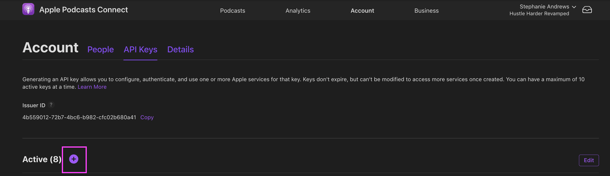
3. Click the **"+" button** to generate a new API key. Name it something recognizable like "CoHost."
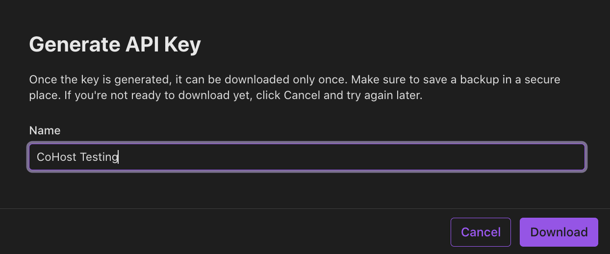
4. By clicking "**Download"** the .pem file will download immediately. Apple only lets you download it once per key so ensure you keep it in a safe spot!
5. **Copy the Key ID** shown next to your new key.
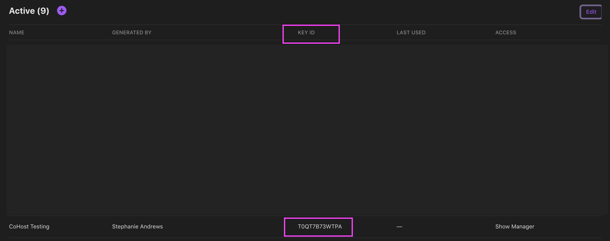
6. **Copy the Issuer ID** shown at the top of the Keys page. This is the same for all your keys.

### **Steps to setup Apple Podcasts in CoHost**
1. Go to CoHost and [log in](https://secure.cohostpodcasting.com/) with your credentials.
2. From the left navigation, go to **Integrations**. Apple Podcasts will appear in the integrations table with a status of "Not connected."
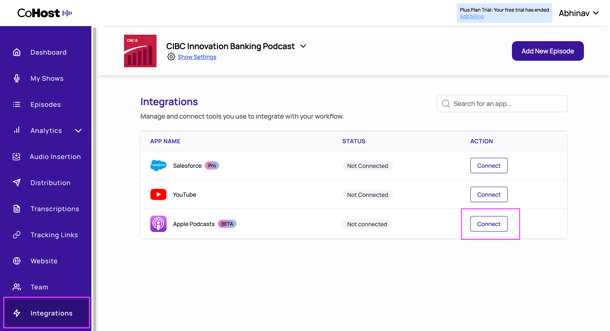
3. Click "**Connect"** next to Apple Podcasts.
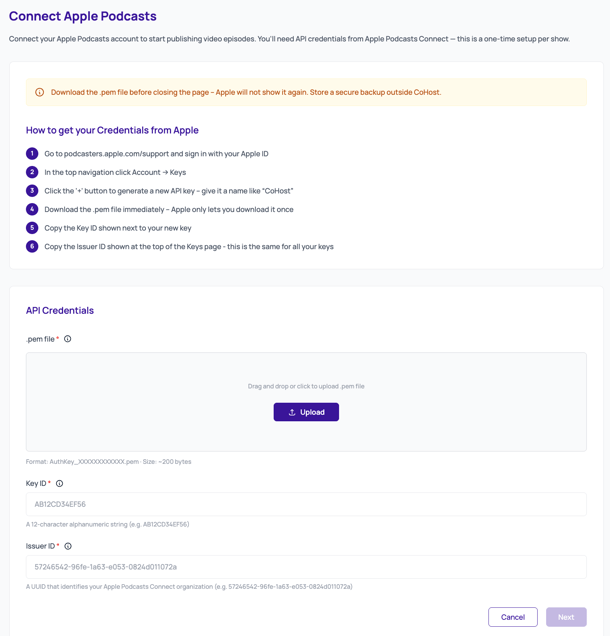
4. On the Connect Apple Podcasts page, upload your **.pem file** and enter your **Key ID** and **Issuer ID** in the fields provided. When all three are filled in, click “**Next”**.
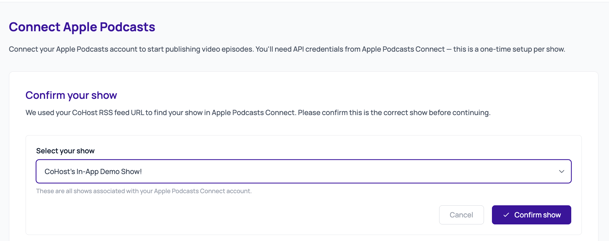
5. CoHost will automatically match your show using your RSS feed URL. Carefully review the show displayed before confirming — some Apple Podcasts Connect accounts have duplicate show records, so double-check details like the title and artwork match your intended show exactly. If it isn’t correct, click "**Select manually instead"** to choose your show from a dropdown of all shows associated with your Apple Podcasts Connect account.
6. Review and accept both required terms:
- **Apple Podcasts Connect Terms of Service**: Click "Open terms" to review in a new tab, then check the box to accept on behalf of this show.
- - **Your content responsibility**: Check the box to confirm the content you publish meets [Apple's guidelines](https://podcasters.apple.com/support/891-content-and-subscription-guidelines) and [CoHost's Terms of Service.](https://cohostpodcasting.com/terms-and-conditions/)
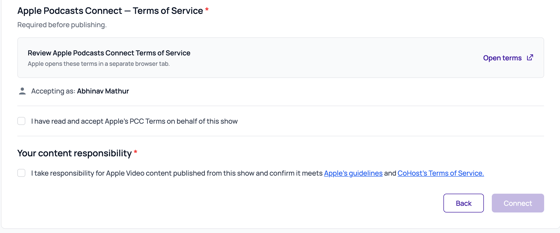
- Click "**Connect"**. Apple Podcasts will now show as "Connected" in your Integrations table.
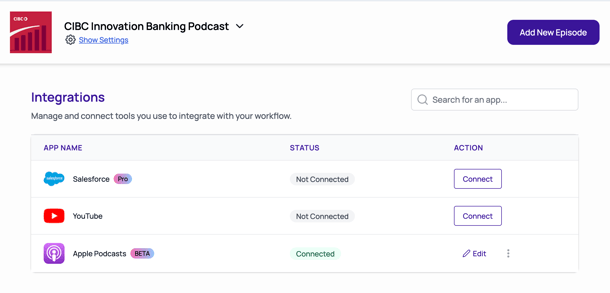
**Note:** Store a secure backup of your .pem file outside of CoHost. If your key is revoked or lost, you'll need to generate a new one from Apple Podcasts Connect and reconnect.
### **How to add a video file to your episode in CoHost**
#### If you've connected Apple Podcasts and want to publish a video episode, you'll create your episode through the Audio & Video podcast flow. This is a two-step process: audio is set up first, followed by video.
#### **Steps to create a video episode**
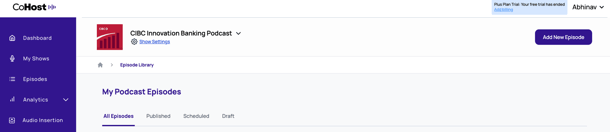
1. From the left navigation, go to **Episodes**, then click "**Add New Episode"**.
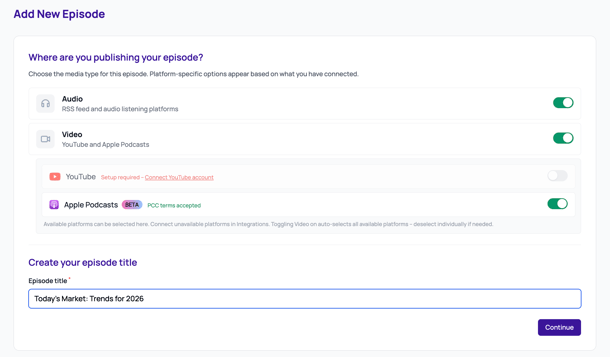
2. Toggle both the **Audio** and **Video** options on as your episode type. Specify which video platforms you want to distribute on.
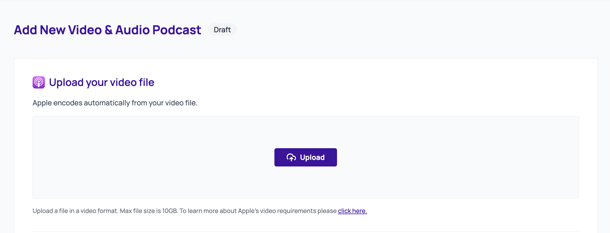
3. On the **video step**, upload your video file by dragging and dropping or clicking "**Upload"** in the video upload area.
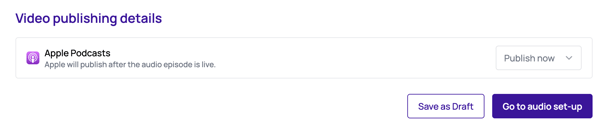
4. Under **Video publishing details,** you’ll see a publish option for **Apple Podcasts (Video)**. Note that this setting doesn’t currently take effect — video publishing happens as a separate, explicit step later (see below). When ready, click **"Go to audio set-up".**
5. On the **audio step**, upload your audio file and fill in your episode details, including title, description, keywords, and category. Under **Publishing Details**, set your audio publish option for Apple Podcasts (Audio). When ready, click "**Publish"**.
6. Under **Apple Thumbnail**, upload a custom thumbnail. If you don't upload one, Apple will generate a thumbnail automatically once your video is published. Dimensions must be 1280×720, accepted formats are JPG or PNG, max 2MB.
7. When ready, click "**Publish"** to submit your audio episode, or **"Save as Draft"** to save your progress. Note that saving as draft applies to both audio and video. You’ll need to update the publish option on either step to change this.
---
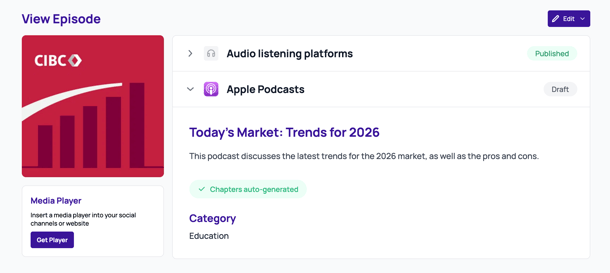
**Note:** Publishing your audio episode does not automatically submit your video to Apple. Video requires a separate, explicit submission, for now. Once your audio episode is live, go to **View Episode** and use the "**Edit"** dropdown to publish your video.
#### **To upload your video file to CoHost, it will need to meet the following requirements:**
| Requirement | Detail |
| --- | --- |
| Accepted formats | MP4, M4V, or MOV only |
| Max file size | 10 GB |
| Max duration | 2 hours |
| Aspect ratio | 16:9 landscape |
| Frame rate | Up to 30 fps |
| Audio | Must include an audio track — video-only files aren't accepted |
| Resolution | Exactly 1920 x 1080 |
CoHost checks file type and size before processing starts. Other requirements, including resolution, orientation, frame rate, and required audio/video tracks, are validated during processing. If validation fails, the episode is marked Failed with instructions to correct and resubmit the file.
### **What CoHost builds automatically**
Once your file is uploaded, CoHost compresses it and generates everything Apple Podcasts requires; you don't need to touch any of this:
| Stream | Status | Purpose |
| --- | --- | --- |
| 720p video | Required (generated automatically) | Default quality on iPhone |
| 1080p video | Required (generated automatically | Default quality on iPad, Mac, Apple TV, Vision Pro |
| 480p video | Generated automatically | Smoother playback on slower connections |
| Audio-only stream | Required (generated automatically) | Delivered to listeners who haven't opted into video |
| I-frame seek stream | Required (generated automatically) | Lets listeners scrub through the timeline and see preview frames |
**A note on 4K/1440p:** CoHost currently requires an exact 1920×1080 source. Higher or lower resolutions, including 1440p and 4K, are not currently supported.
CoHost retains your original uploaded file alongside the compressed master copy and the video/audio streams listed in the table above. We keep the original to support retries and to manage the file across each destination’s lifecycle.
The following are taken care of by CoHost.
#### **Captions**
Video episodes published through CoHost don't currently include captions in our initial release. You don't need to do anything here; CoHost's files correctly declare that captions are absent, so this won't cause playback issues.
#### **Chapter markers**
Chapter markers are generated automatically for video episodes, so there's nothing to add manually. They'll appear natively in the Apple Podcasts player so listeners can jump to different sections of your episode.
### **Publishing is asynchronous**
After you hit Publish, CoHost still has work to do: encoding your file, validating it, and submitting it to Apple Podcasts, followed by Apple Podcasts review. Because of this:
- You'll see a message letting you know it's safe to navigate away. You don't need to keep the page open.
- You'll be notified on the episode page once the process completes or fails.
- If you come back to the episode while it's still processing, you'll see a pending indicator.
**"Submitted" isn't the same as "live."** Submitted means CoHost has finished its part; Apple Podcasts still needs to complete its own review before the episode is available to listeners.
### **Status meanings**
Your episode's Apple Podcasts status is tracked independently from its YouTube and audio RSS status, since Apple Podcasts runs its own post-submission review. You may see:
| Status | What it means |
| --- | --- |
| Draft | Staged, not yet published |
| Published | Live on Apple Podcasts |
| Scheduled | Accepted by Apple Podcasts with a future publish date |
| Archived | Previously published, now archived |
| Rejected | Your episode did not pass the Apple Podcasts review process |
| Pending: Issue Found | Apple Podcasts flagged a content issue on a previously published episode |
| Unknown | A status Apple Podcasts returned that we haven't mapped yet — our team gets alerted automatically |
| Processing | CoHost is compressing the file and validating it before submission |
| Failed | Validation failed (resolution, orientation, frame rate, or missing tracks) — check the error message, fix the file, and resubmit |
If Apple Podcasts rejects your episode, you'll get an in-product message pointing you to their guidelines, and you can resubmit once you've made changes.
You can also remove your episode from Apple Podcasts only, YouTube only, or both, if you revert it to draft. The other destination(s) stay untouched.
### **Keeping your episode available**
Once a video episode is published, Apple Podcasts may re-request your files well after the original publish date. As long as your episode stays published on CoHost, the file stays reachable; you don't need to manage hosting or file availability yourself. If you delete the episode, those files (and their URLs) are removed.
### **Common reasons an episode might fail**
- Uploading a file in a format other than MP4, M4V, or MOV
- Uploading a file over the 10 GB limit or longer than 2 hours
- Missing Apple Podcasts Connect Terms or CoHost Terms acceptance for the show
- No valid Apple API key bundle on file, or a key that's been revoked
- Apple's post-submission review declining the content
- Video resolution isn’t exactly 1920×1080
- Frame rate above 30 fps
- Missing an audio track or missing a video track
- Video delivery not enabled for your show on Apple Podcast side – the episode can still show Published in CoHost with audio playing normally, just the video won't be visible to listeners
### **Checklist: before you submit a video episode**
1. **Confirm your file format and size:** MP4, M4V, or MOV, under 10 GB, under 2 hours, 16:9 landscape, with audio included.
2. **Confirm your show has accepted both checkboxes**: Apple Podcasts Connect Terms and CoHost's terms and conditions.
3. **Confirm your Apple API key bundle is on file**: .pem file, Issuer ID, and Key ID from your Apple Podcasts Connect account.
4. **Select your destinations:** Choose Apple Podcasts alongside or instead of YouTube and/or your audio RSS feed.
5. **Confirm your video’s resolution and frame rate:** exactly 1920×1080, 30 fps or lower, with both audio and video tracks present.
**Need help?** If you're not sure whether your show or video file meets these requirements, [reach out to our support team](https://help.cohostpodcasting.com/kb-tickets/new?hsLang=en-us) with your show and episode details, and we can help troubleshoot before you publish.
- [Getting Started with CoHost](https://help.cohostpodcasting.com/getting-started-with-cohost?hsLang=en-us)
- [Create, import, and modify my podcast](https://help.cohostpodcasting.com/create-import-and-modify-my-podcast?hsLang=en-us#main-content)
- [Podcast Migration](https://help.cohostpodcasting.com/create-import-and-modify-my-podcast?hsLang=en-us#podcast-migration)
- [Editing/Updating My Podcast](https://help.cohostpodcasting.com/create-import-and-modify-my-podcast?hsLang=en-us#editing-updating-my-podcast)
- [Create, publish, and edit my episodes](https://help.cohostpodcasting.com/create-publish-and-edit-my-episodes?hsLang=en-us#main-content)
- [Episode Set Up](https://help.cohostpodcasting.com/create-publish-and-edit-my-episodes?hsLang=en-us#episode-set-up)
- [Episode Publishing](https://help.cohostpodcasting.com/create-publish-and-edit-my-episodes?hsLang=en-us#episode-publishing)
- [Episode Editing](https://help.cohostpodcasting.com/create-publish-and-edit-my-episodes?hsLang=en-us#episode-editing)
- [Distribute my podcast](https://help.cohostpodcasting.com/distribute-my-podcast?hsLang=en-us#main-content)
- [Podcast Fundamentals](https://help.cohostpodcasting.com/distribute-my-podcast?hsLang=en-us#podcast-fundamentals)
- [Listening Apps](https://help.cohostpodcasting.com/distribute-my-podcast?hsLang=en-us#listening-apps)
- [RSS Feed](https://help.cohostpodcasting.com/distribute-my-podcast?hsLang=en-us#rss-feed)
- [General](https://help.cohostpodcasting.com/general?hsLang=en-us)
- [Grow my podcast](https://help.cohostpodcasting.com/grow-my-podcast?hsLang=en-us#main-content)
- [How To's](https://help.cohostpodcasting.com/grow-my-podcast?hsLang=en-us#how-tos)
- [Tips & Best Practices](https://help.cohostpodcasting.com/grow-my-podcast?hsLang=en-us#tips-best-practices)
- [Managing my CoHost account](https://help.cohostpodcasting.com/managing-my-cohost-account?hsLang=en-us#main-content)
- [Adding Features](https://help.cohostpodcasting.com/managing-my-cohost-account?hsLang=en-us#adding-features)
- [Billing](https://help.cohostpodcasting.com/managing-my-cohost-account?hsLang=en-us#billing)
- [Team Members](https://help.cohostpodcasting.com/managing-my-cohost-account?hsLang=en-us#team-members)
- [Multi-Show Management](https://help.cohostpodcasting.com/managing-my-cohost-account?hsLang=en-us#multi-show-management)
- [Prefix](https://help.cohostpodcasting.com/managing-my-cohost-account?hsLang=en-us#prefix)
- [Free Trial](https://help.cohostpodcasting.com/managing-my-cohost-account?hsLang=en-us#free-trial)
- [Troubleshooting](https://help.cohostpodcasting.com/troubleshooting?hsLang=en-us)
- [Understanding my CoHost features](https://help.cohostpodcasting.com/understanding-my-cohost-features?hsLang=en-us#main-content)
- [CoHost Tracking Links](https://help.cohostpodcasting.com/understanding-my-cohost-features?hsLang=en-us#cohost-tracking-links)
- [Automatic Websites](https://help.cohostpodcasting.com/understanding-my-cohost-features?hsLang=en-us#automatic-websites)
- [Automatic Transcriptions](https://help.cohostpodcasting.com/understanding-my-cohost-features?hsLang=en-us#automatic-transcriptions)
- [Audio Insertion](https://help.cohostpodcasting.com/understanding-my-cohost-features?hsLang=en-us#audio-insertion)
- [Websites](https://help.cohostpodcasting.com/understanding-my-cohost-features?hsLang=en-us#websites)
- [Show Analytics](https://help.cohostpodcasting.com/understanding-my-cohost-features?hsLang=en-us#show-analytics)
- [Understanding podcast analytics](https://help.cohostpodcasting.com/understanding-podcast-analytics?hsLang=en-us#main-content)
- [Growth Metrics](https://help.cohostpodcasting.com/understanding-podcast-analytics?hsLang=en-us#growth-metrics)
- [General Analytics](https://help.cohostpodcasting.com/understanding-podcast-analytics?hsLang=en-us#general-analytics)
- [Engagement Metrics](https://help.cohostpodcasting.com/understanding-podcast-analytics?hsLang=en-us#engagement-metrics)
- [Audience Insights](https://help.cohostpodcasting.com/understanding-podcast-analytics?hsLang=en-us#audience-insights)
- [CoHost Updates](https://help.cohostpodcasting.com/cohost-updates?hsLang=en-us)
[](https://www.cohostpodcasting.com)
Robina Avenue, York, ON
[mailto:email@email.com](mailto:email@email.com)
Copyright © 2024, cohostpodcasting.com